OK, here is a demo of a “4 box” tutorial mask like I described above.
cut_out_highlight_2.rp (106.1 KB)
- I duplicated your Page 1 to Page 2 and moved your image to back.
- I made four rectangle widgets with black 33% opacity fill (and placed them at the edges of your content area.) They also have a Loaded event that hides them by default.
- Mask Top
- Mask Bottom
- Mask Left
- Mask Right
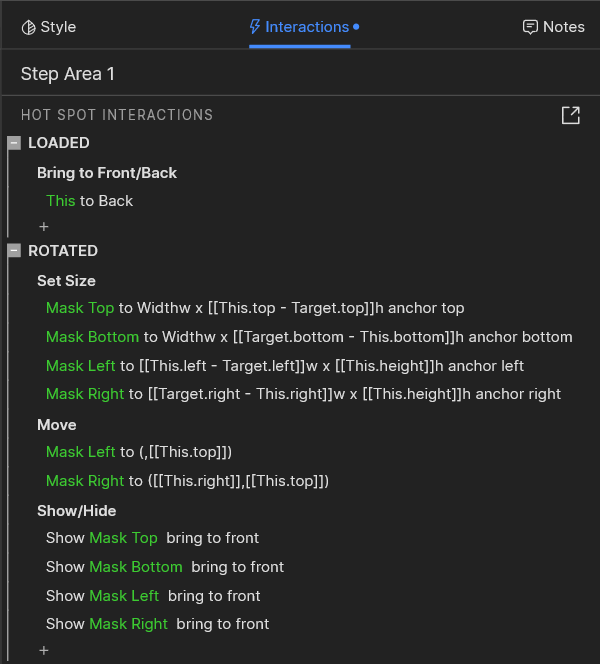
- I resized your hotspot widget to same size as your initial hole and named it, “Step Area 1”
- I added a Loaded event with “Bring to Front/Back This to Back” action so it is easier to place, size, and see these tutorial hotspots in the editor, but they won’t get in the way in the browser.
- I added a Rotated event to the hotspot to use as a kind of subroutine to move and size the mask widgets and create a hole with this hotspot’s dimensions and location automatically. (I would have used Selected but hotspots don’t have that interaction; you could use a rectangle widget instead of a hotspot and use its selection state to trigger the following mask changes.)
- When the hotspot’s Rotated event is fired, it resizes each mask widget and moves it if needed, using the hotspot’s own properties, then shows each mask.
- Here’s the code:
- Some details to note …inspect the code in Axure to see them
- The mask widgets are already positioned at the edges of the content area, so need to move them is minimal. You could place them anywhere in the editor, with any default dimensions, hidden, etc. and add some Move commands as needed.
- Mask Top is at top-left and full width so it doesn’t need to be moved, and only its height needs to be resized. So, in the Set Size action, I leave the width dimension blank–it won’t be changed–and use a simple expression to calculate its height so that it comes right to the top of the hotspot.
This.toprefers to the top of the widget making this action–the hotspot.Target.toprefers to the top of the widget being acted upon–resized–which is the Mask Top widget. - Mask Bottom is at the bottom edge of the content area, and it could be moved to the bottom of the hotspot and resized to the bottom of the content area, but it is simpler to leave it where it is and resize it just like Mask Top, except resize it from the bottom up. So, I specified a bottom anchor point for its Set Size action. (In the RP editor, click into this action and look at the 9-point anchor button–click one of the anchor points to set this:)

- Mask Left is at the left edge, so resizing is similar to Mask Top and Mask Bottom. Its x-position doesn’t need to move, but its top needs to move to the top of the hotspot so it won’t overlap with Mask Top.
- Mask Right is resized and moved similar to Mask Left. Pay attention to the anchor point again.
- Those are the basics. Look at the “Step 1” button to see how easy it is to set your tutorial mask with a hole, once your “interactive hole hotspot” is set up. It’s just
Fire Event Step Area 1 fire Rotated
(…if you use a rectangle widget with the resize and move actions assigned to its Selected event, then you’d just need toSet Selected Step Area 1 to "true"…and I’d recommend assigning a selection group for all of your “Step Area” widgets so only one can be selected at a time.) - You can duplicate a hotspot, move it around and size it as needed for additional tutorial holes.
The square hole isn’t as attractive as the ellipsis, but this approach is pretty efficient for your 20-step tutorial. You could probably make some “inverted radius” corners so the hole would at least have rounded edges. What I’m thinking of here is like four little corners with square outer edge and concave rounded inner edge, and each moved to the corners of the hotspot. You could make these in Axure with a 20x20 (or whatever size) square with the same fill as the masks, then place a 40x40-ish circle in front, lined up with top-left of square, select both, right-click and choose Transform > Subtract (or Exclude, whichever works…)