I can do this successfully for straight linear lines by simply setting the size to start from a small width (point A) and then setting the final state to the width to point B.
How can I do this for diagonal lines?? Whenever I try to increase the width of a diagonal line, the entire line itself shifts up on the page.
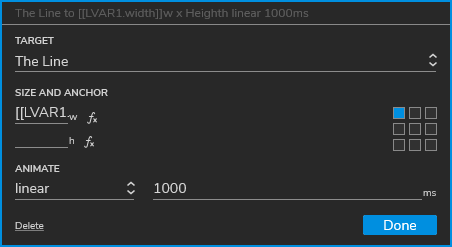
By “diagonal lines” I assume you mean a Line widget or rectangle widget that is rotated. When you resize a widget, you can specify an anchor point, by default the upper-left corner, but you can change this in the Set Size action options:
However, when a widget is rotated, the anchors don’t work as you’d expect. They are basically broken if the rotation is not at 0°. I think this might due to the anchor not rotating with the widget’s orientation, as that would cause the drift effect. It should probably be filed as a bug. Now, if you select the center anchor option it keeps the widget stable, but it can only grow/shrink from the center point, and that doesn’t work for your scenario.
When I’ve needed to do something like this, I use a “cheap hack” to fake the animation. Basically, create a line in the editor from point A to point B (you can draw this with the pen tool; you can even use the Connector feature so when you move the “point widgets” around in the editor the line stays connected and resizes automatically. Bonus: you can even edit a widget’s anchor points to customize connection points.) Cover this line with a “masking” widget–like a rectangle with no border and white fill (or whatever to match your background.) To animate the line being drawn, just hide the mask, using an animated transition. See file below for a demo.
I wondered if anyone has posted a better solution, and found this thread:
Check out the resulting tutorial from @nithindavis …it’s the bomb!
That solution was for RP8, but it works perfectly (for me) in RP9. I applied it to (what I think is) your scenario.
The Basic Line Sizing page demonstrates the problem with resizing a rotated Line widget, with some buttons to show various approaches at animating a line draw between two points. The “Fake It” button shows my “mask animation” hack.
The Dynamic Line Draw page is a direct port from lineDraw.rp in the tutorial above.
The Animated Line Draw page copies the “Pull Me” widgets, makes them invisible, and moves them to animate the line being drawn.
I cut the core actions from the DRAGGED event to MOVED (which doesn’t change functionality) so that the “boxes” can be remotely moved without a user drag action.
I deleted the widgets in the box1 and box2 dynamic panels so they would be invisible.
To “draw the line” I first move box1 and box2 to the first location (point A), then gradually move box2 to the second location (point B.)
I tried using an “Animate Linear 1000 ms” option in the Move action, but this had no effect on the resizing of the line. (the “Draw a Line Slowly” button shows this.)
I then reverted to moving box2 little bit by little bit toward point B.
To assist with this, I created a dynamic panel to act as a “move function” which can repetitively move box2 by a set distance. I added boundaries to ensure it doesn’t move too far.
You can adjust the speed and smoothness by changing the Set Panel State action’s “repeat every N ms” and/or moving box2 by smaller/larger distances.
All I did for the mask was to drag in the “Box 1” widget from the default library (but any rectangle will do) and set that widget’s Border to 0 (zero) (…and ensure the Fill matches the background, by default White, #FFFFFF.) Then size it appropriately and send it back/forward–behind all the widgets except what I need to cover with this mask.
To “animate” you can either hide the mask widget, like I did, or resize it, or move it, or change its opacity …whatever makes most sense or ends up with the visual effect you want.