Often when you work with a password field, you might want to set up additional parameters for password validation. It is possible to do that in Axure by using some conditional logic.
Widget setup: Since my post is more about using conditional logic, I used only a minimal set of widgets: a text field, a label for it, a submit button, and labels that will disappear as corresponding conditions are fulfilled.
Action: I selected the “Password input” text field and added the “KEY UP” interaction on the Interaction Pane. This way, the conditions will be checked whenever you enter a new character into this text field. Then I hovered over the interaction and clicked on the “Enable cases”> “Add condition”>“New condition” buttons to get to the “Condition builder” dialog.

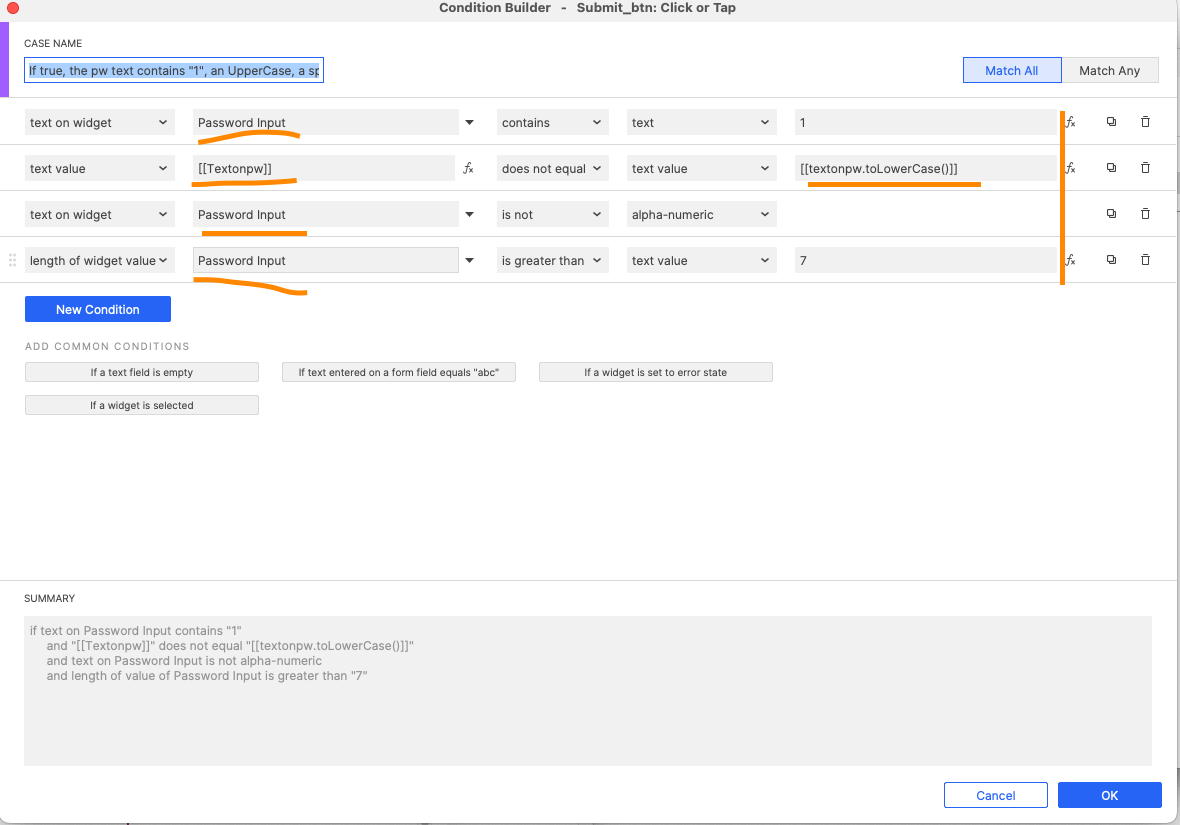
The first condition checks if the text does not contain uppercase letters. To add it, hover over the interaction and click on the “Add Conditions” button. In the condition builder dialog, add a local variable for the text in the text field and compare its value with the value of the same variable affected by the function .toLowerCase(). If they are not equal, some uppercase letters are in the text input, and the label with the warning that the pw should contain some uppercase letters can be hidden.


The second condition validates if the text contains a special character. To add it, hover over the interaction and click on the “Add Case” button. Then enter the condition that checks if the text in the password field is not alpha-numeric. In other words, if it contains something else except for digits and letters. If the condition is fulfilled, the label with the special character warning can be hidden.


The third condition checks the length of the entered text. To add it, hover over the interaction and click on the “Add Case” button. In the condition builder window, click on the leftmost droplist and select “length of widget value”, then “is greater than”, and the desired length. In my case, if its length is greater than seven characters, the label responsible for the length warning is hidden.


Tip: You can use the “Max Length” field on the Interaction pane to limit the number of characters in the text field.

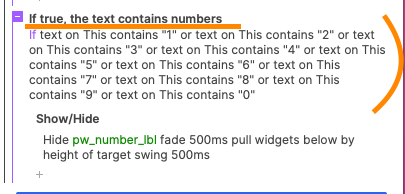
The fourth condition checks if the text contains numbers. To add it, hover over the interaction and click on the “Add Case” button. In the condition builder dialog, add conditions that validate if the text on this widget contains a digit for every single digit, and join these conditions by logical “OR”. If it does, then the label with the number warning is hidden.

Finally, for the “Submit” button, I added conditions that summarize all four conditions above. “Else if” here play the role of logical OR for digits. If all conditions are fulfilled, a link to another page will open when you click the “Submit” button.

You can see these conditions in action on the “Password validation check” page.
However, if you’d instead use just one condition for the “Submit” button, then it’s possible if you add an invisible repeater with one widget inside that contains digits [0-9] in its dataset. Then, you can add the Listener by moving the widget inside a repeater by (0,0) whenever you click or tap on the button. After this, under the “Moved” interaction, you fire the conditions from the first to the third by using logical AND and add another condition that checks if the text on the password text field contains items from the repeater column. You can see how it looks on the page “Password validation check with a repeater”.


Here is the link and my .rp file: checkpw.rp (104.0 KB)
Happy prototyping!