Is it possible to create a new list item in a droplist when prototype is in preview?

newbie-question

#1

got assigned a project at work to prototype a new functionality for our software. essentially i am mocking a survey building tool. first you can pick a question category, next write in the question, then select the answer type (categorical, quantitative, multiple choice, other) and finally options can be checked using checkbox’s. ill include an image to help clarify.

what i’d like, is for a user to be able to input their survey question using the tool pictured above and then press the submit button and have the information populate a table like the one shown below.

i have created the tool using horizontal menus, text fields and rectangles. then I added basic interactions (click or tap, text changed, selected, unselected) to populate the table. this instantly populates the table and doesn’t allow the tool to be filled out before pressing submit and having everything populate at one. Should I be utilizing dynamic panels or is there a better way? I am certainly a newbie at this, which I’m sure is evident but if anyone has a suggestion on how I might be able to remedy this or if there is a simpler way about it I’ll take any advice you’ve got.


#2

The best way to achieve this in Axure is with a Repeater widget for your “results table” because you can add, remove and update the rows in a Repeater …but, Repeaters have a long learning curve, so I wouldn’t necessarily recommend you try that approach as a newbie. Depends on your experience and comfort with programming.

You could create your default empty results table with a Table widget that has N rows, where your prototype would be limited to N questions. Say you only need to demonstrate this by creating 3 questions. Then your table only needs 4 rows (first row being the titles). As long as you name each cell in the Table widget, you should be able to easily select the correct cell to update with a Set Text action. Or, you could just manually build your “table” using rectangle widgets (which is maybe what you’ve done already?) Either way, I recommend naming all your widgets to make them easier to pick as targets for your Set Text actions. If you group all the cells in each empty row then you can hide each of these rows by default, then easily show them one at a time, as each row gets updated via the Submit button.

You’ll want to put all your logic on the Click or Tap event of the Submit button. It can “look at” the selection states, text values, etc. of each component and fill out the rows in the results table, rather than each component trying to update the row itself.

If the Question Category choices are to be all visible at once, I would recommend a List Box widget, so the selected option is easily determined. Otherwise, if separate rectangle widgets, they should all be assigned to a Selection Group to ensure only one can be selected at a time. Upon selection the widget could set the value of a global variable so it can be referenced by the Submit button.

If these suggestions don’t make sense, I could mock up something for you. Might be easier to do so if you upload your .rp file as you have it so far.


#3

Hi mbc66! I appreciate all of the great tips and suggestions. What I had created thus far was a very basic prototype, where none of the widgets had any logic applied to them. I’ve been researching ways to enhance my prototype and have decided to start over from scratch and try using dynamic panels, global variables and hot spots to mock something up. I’m hoping that this gets me closer to something functional. I have some experience with programming so as I develop my Axure skillset i hope to be able to apply that logic to my widgets. I will also get into the habit of naming everything as you suggested as I can see how useful this can be in the long-run. Once I have something put together I can send the .rp file your way if you have any suggestions. Thank you!


#4

I was able to get the table to populate with use of global variables and setting text through click or tap. I know that as a new prototyper overcoming my next goal might be a bit ambitious until I have a more solid grasp on the fundamentals. I am attempting to add an additional category to a droplist when the prototype is in preview. Is it possible to link a new page from a selection in the droplist that would allow me to type in a new category and then submit it back to the droplist as an additional category? I could not find a way to assign a new interaction to droplist items, so perhaps I should create another button links a page where a new question or answer category can be created and then submitted back into the droplist of the question builder.


#5

Not sure what you mean by “link a new page” but yes, you could set some global variables, open a page, let that page change those global variables, then open the first page. Would be easier (and better usability) to stay on the same page and show a modal dialog, or even a “fake page” as a dynamic panel. Axure doesn’t let users dynamically create pages in a prototype. Of course you can do this in the RP editor. You can fake new pages with dynamic panels and/or inline frames, or you can use an existing page as a “new (to the user) page”.

You can’t dynamically edit a Droplist widget–i.e., let a user add/remove/change the contents of a Droplist. If it is a “pre-canned” edit–you know the exact item to be added and page to link–you could do this by creating a second Droplist widget in a dynamic panel state. So the first state would have your initial Droplist, second state the “new” Droplist. Usually, this fakery works fine for demos, specs, and even most usability tests–it’s enough to get across the concept.
Here is a similar approach in an Axure Tutorial:

If that’s not enough and you really need a user to freely enter in any text as a new category, this really begs for a Repeater, but you can do this in a limited fashion with basic widgets. So, instead of a Droplist widget, you’d manually build your list with rectangle widgets in a group or dynamic panel, and show/hide it as needed. (Sounds like that’s what you’ve already done.) Create one or more empty list items–however many you need (that’s the “limited” part)–so maybe one is enough, maybe you need up to 10–and hide them by default. When user creates a new item (you’ll need a text field to capture their input) use Set Text with the text field’s text value as the source and the hidden widget as a target, then show that widget. If you have more than one you can use a global variable to track which widget to set text and show. E.g.,

If NewCategoryCount equals “1”
Set Global Variable NewCategoryCount to [[NewCategoryCount + 1]]
Set Text new_category_item to text on widget CategoryInputField
Show new_category_item

You cannot directly change interactions for a Droplist item, nor any widgets. You can pre-build all the possible interactions and use conditional case logic to fire the appropriate action. E.g.,

if selected option of MyDroplist equals Parking
Set Text MySurveyCategory to “Parking Category”
Else if selected option of MyDroplist does not equal “Create another category”
Set Text MySurveyCategory to selected option of MyDroplist

…or…

If length of widget value MyInputField equals “0”
Show ModalDialogPanelA bring to front
Else if OnLoadVariable contains “error”
Show ModalDialogPanelB bring to front
Else if MyInputField contains “Access”
Show AccessibiltyColumn
Else if MyInputField contains “Create another”
Open “Page 2” in Current Window
etc. …

So far you don’t need anything that fancy in a repeater, so this is a good chance to try them out. Here is Axure’s documentation on Repeaters, with a primer video. There are also some of their tutorials that use repeaters: https://docs.axure.com/axure-rp/reference/repeaters/

I made a little demo of how this could be implemented using Repeaters.
Custom List and Table.rp (105.7 KB)

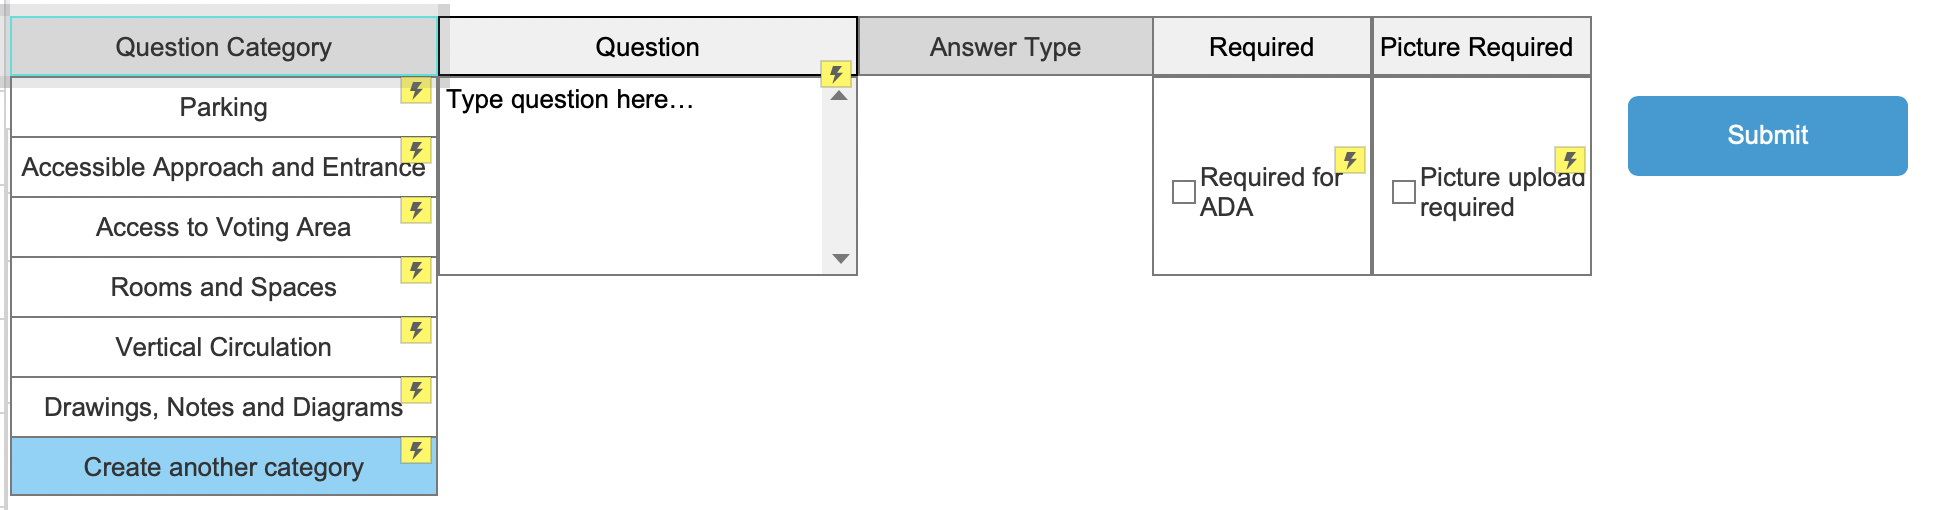
  • There is a Repeater widget, named “Q Cat List” for the Question Category list that allows user to:

    • Select an item
    • Create a new item
    • Remove a custom-created item
    • I chose to create a dynamic panel within the repeater cell (and this same approach can be used outside a repeater as well) with one state for each of these 3 functions.
      • Clicking on a category item selects it and sets a global variable, named “VarQCat” to its text, which the Submit button uses to assign to the Survey table.
      • Clicking on the “Create…” item sets the dynamic panel to a state named “New Input” which contains a text field. When user presses the Enter key (and field is non-empty) it adds a new row to this repeater list.
      • When a new item is created it is flagged as “custom” and gets a little ‘x’ icon. Clicking this icon shows a choice to delete or keep–and this is the third dynamic panel state.
    • So, this list now has some useful features (or if you not useful for your purposes, easily removed or not invoked) which only needed to be created and handled once–in the repeater cell–rather than 6 or more instances–so demonstrates how repeaters can be quicker to set up and typically much easier to maintain. A user can add as many new items to the list as they want, so your prototype acts more like a real application.
  • I “wrapped” this repeater in a dynamic panel so that when it gets resized it can easily move the Survey Table below it to maintain consistent padding. See the Resized event of “Q Cat Panel”. (Likewise, I wrapped the Survey label, title row and Survey Table repeater in a dynamic panel named “Survey Panel”)

  • Another Repeater widget, named “Survey Table” has a column for each column in the “builder table”

    • In the RP editor, you’ll see one row (with the default text labels I set up) but in the browser it does not appear because there are no rows set in its datasheet.
    • If you wanted to show blank rows, just add rows with no content to the datasheet (select the repeater and look in the STYLE pane.)
  • The Submit button takes the chosen items and entered text from the builder table and adds a row to the Survey Table repeater with these values. Then it resets the builder table widgets to their defaults.

    • Two global variables help track things:
      • VarQCat stores the chosen item from the “Q Cat List” repeater
      • VarAType stores the chosen radio button from Answer Type (just making up this stuff since it was blank in your screenshot)
    • Everything else can be directly determined from the widgets in the builder table.
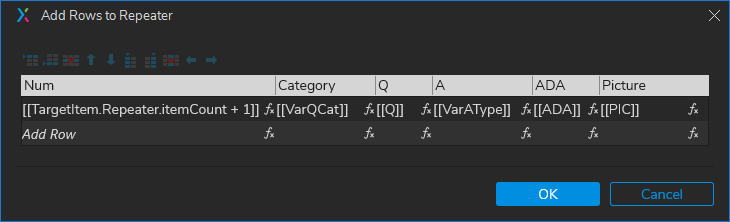
    • Take a look at the Add Rows action of the Submit button’s Click or Tap event.
      • Click the “add 1 row” line
      • Click the “Add Rows” button (just to see what it contains)
        • (The dialog can be widened to see all the columns, and each column can be widened)
        • Each cell in the row (to be added) contains an expression defining the value to add for the given column.
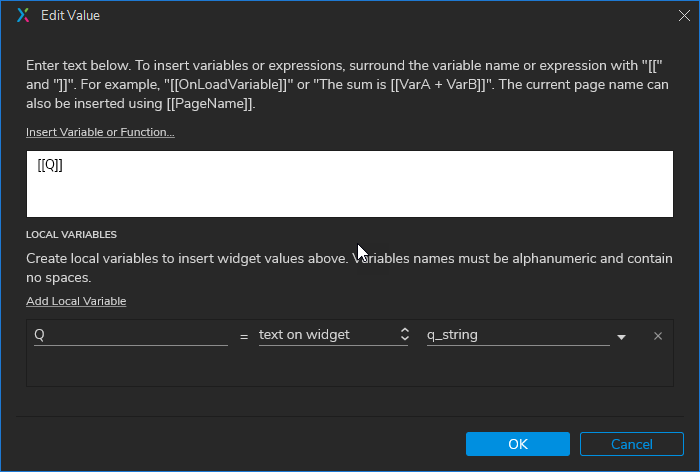
        • Click the little fx icon in a cell to open the Edit Value dialog. This is the best way to look at the full expressions used. An “expression” in Axure is a way to represent the results of math, functions, variables, string manipulations, etc., and are always wrapped in double-square brackets. For example, [[1+2]] results in the value, “3”; [[OnLoadVariable]] results in the value of the global variable named “OnLoadVariable”; [[OnLoadVariable.substring(0, 3)]] results in the first three characters of that value.
        • In the Edit Value dialog, if you click on the “Insert Variable or Function” link you get a categorized list of all the global variables, repeater elements, math and string functions, etc. This is a great way to learn how these expressions are used, what’s possible, and especially for repeaters, an easy and reliable way to refer to their contents.

#6

Your reply has been very helpful in designing my prototype. In the last week I have been reviewing your post, the demo you provided and been attempting to recreate some of the functionality on my own prototype.

I have found that your demo is like an onion, in the sense that the more understanding I gain, the more layers of logic I uncover. After reviewing the repeaters documentation you included, I understand the essence of repeaters and that it is going to require practice to use them efficiently.

I was wondering if you could explain how and why you applied global variables to the demo. How as in, what widgets are they interacting with. Why, because the demo is all contained in one page and I understood global variables to allow interaction between widgets that are in different pages of a prototype.


#7

Glad you find it helpful. Yes, you’re right… repeaters are powerful and add efficiency–when set up properly, but the have a long learning curve, and requires patience to learn and use well. Doing things as efficiently as possible is what prototypes are all about. Also, everything I’ve learned about repeaters has been right here on this forum–by reading and trying as well as helping others (you don’t realize how little you know about something until you try to teach it, eh?)

Mostly an efficient way :wink: to track user input for items that can’t easily be determined.

  • The VarQCat global variable is used to store the selected Question Category item

    • When the user clicks a row in the “Q Cat List” repeater (other than “Create a category”) it selects that row. Here are the details of how that works:
      • Deep in the repeater is a widget named “CategoryLabel”, and this widget sets the value of VarQCat
        (you can find this widget by browsing the OUTLINE pane or searching for its name there. The OUTLINE pane is a great way to see the structure of a prototype’s page )
      • When CategoryLabel gets clicked it “highlights” its column in the title above, then marks all rows, then updates marked rows so none are selected (because it doesn’t know which is currently selected) then unmarks all rows, then updates its own row as selected.
      • This row update triggers the repeater’s Item Loaded event.
        • Item Loaded has a conditional Case 2:
          If [[Item.SelectedState]] equals "true"
          Set Selected/Checked CategoryLabel to "true"
          Set Variable Value VarQCat to "[[Item.Label]]"
      • So, when the user clicks on “Parking” the value of VarQCat is set to “Parking”
    • (It would be easier to just have the CategoryLabel widget set itself to selected and set the variable value to its text, rather than all the update the row stuff. However, it would not work as well when a user adds a new category to this list (nor later on if you need to filter or sort the list) so that “feature requirement” kind of drove this approach.)
  • The VarAType global variable is used to store which “Answer Type” radio button is selected.

    • When a radio button’s selection state is changed to Selected, it sets the value of VarAType to its own text: Set Variable Value VarAType to [[This.text]]
    • So each radio button widget can set the value of VarAType.
  • When the Submit button is clicked, it adds a row to the Survey Table, using the user-selected and entered inputs. To do this, it gets the values of the VarQCat and VarAType global variables.

    • Looking closer at the Add Rows (to) Survey Table add 1 row action shows how this works:

    • In the Question Category repeater, there is not a direct, built-in means to query which row item has been selected, especially via an expression in the Add Row action. So when a Question Category item is selected it sets the value of a variable and that variable is directly and easily accessed with an expression: [[VarQCat]]

    • To contrast, the text entered in the Question Text Field widget, named “q_string”, is directly available with a “local variable” that points to that widget’s text value. (Same for the checkbox widgets.)

    • The radio buttons also benefit from setting a variable value as they get clicked. While the state {on, off} of each individual radio button is easily available, determining which radio button out of the group is on is not easily determined. Without a variable I suppose you could set up a conditional case to test each radio button and act accordingly (either replicating the Add Row and other actions in each case; or add the row first without the Answer Type, then call another event to run through the cases and update the row if the radio button being tested in the conditional case logic is on.) That’s a lot of extra overhead.

That is correct. But, it is not the only way to make use of a global variable. More technically, a global variable allows a text value to be accessed by all pages in a prototype. Of course this means that different widgets within the same page can set and get a global variable’s value. As long as you don’t get “too carried away” with global variables, this works well. (Axure recommends fewer than 28 global variables …or at least they used to. You can refer to Axure’s documentation on Global Variables.)

Now, some prototypers disdain global variables, or at least advise limiting use to only when absolutely necessary to pass data between pages. The arguments are they may not be reliable in all browsers on all systems, can get “overloaded”, lost, tax system resources, etc. but I don’t think that really holds in the vast majority of cases and with any “modern” web browser and devices. Relying on them can mean your prototypes and their elements are not as extensible–meaning, if you want to reuse this “survey building tool” in another prototype you’d need to remember to add global variables with the same exact names in that prototype. In my opinion and experience this has not been a problem.

As a comparison, and demonstration of how to do this without global variables, take a look at Page 2 of this updated .rp file.
Custom List and Table.rp (178.3 KB)

I’ve created a set of “page variables” which are just regular rectangle widgets. I placed them in a dynamic panel, which hides itself by default via its Loaded event. For the purposes of demonstration, I added a keyboard shortcut so that Alt+V toggles visibility and you can see these widget text values change dynamically as you click items. The only other difference here is that I changed all the Set Variable Value actions to Set Text actions and from expressions with global variables to expressions with local variables pointing to text values of the “page variable” widgets. There are many ways to place these page variable widgets so they are not visible to users… set it to “hidden”, put it on the page somewhere behind another widget, put it in a dynamic panel outside its viewable area, etc.