I’m new to RP9.0. Being a long time Sketch/InVision user, I really like how much control RP9 has. I’ve only been using it for 3 days and really like it so far. Now I want to build a prototype based on my Sketch designs. It will require some variables and conditions which I haven’t mastered. But I suppose the only way to be good at is to experiment. I’d like to get some advice so I can learn this more effectively.
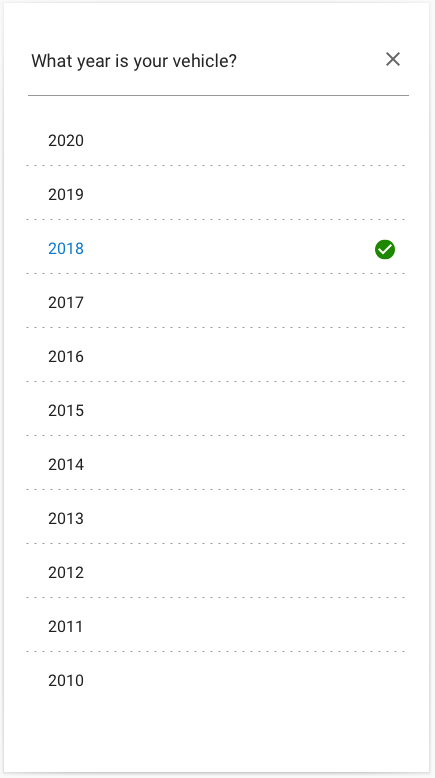
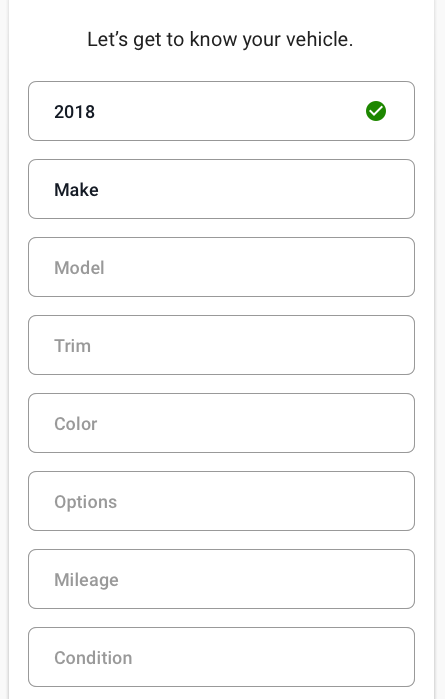
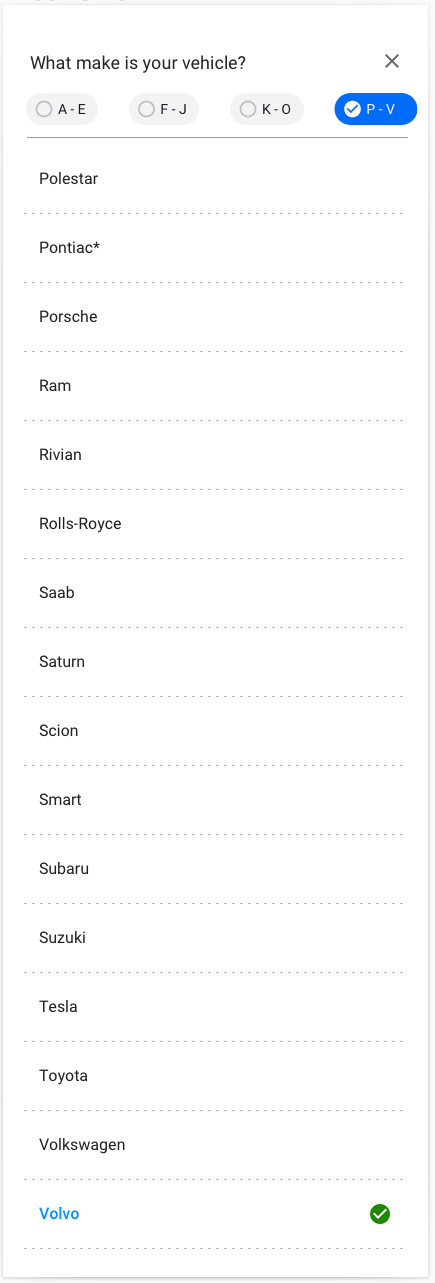
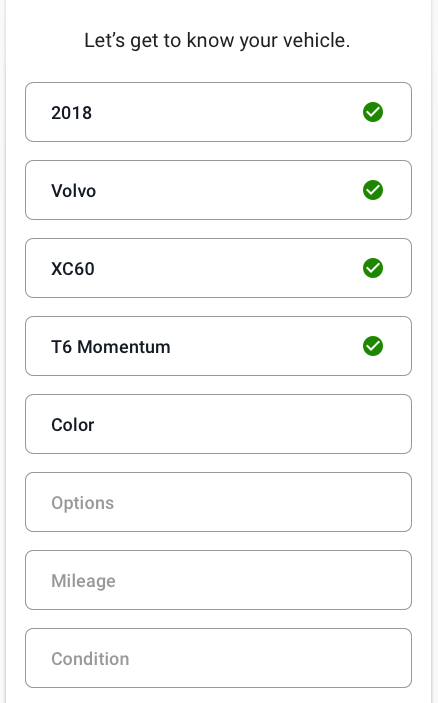
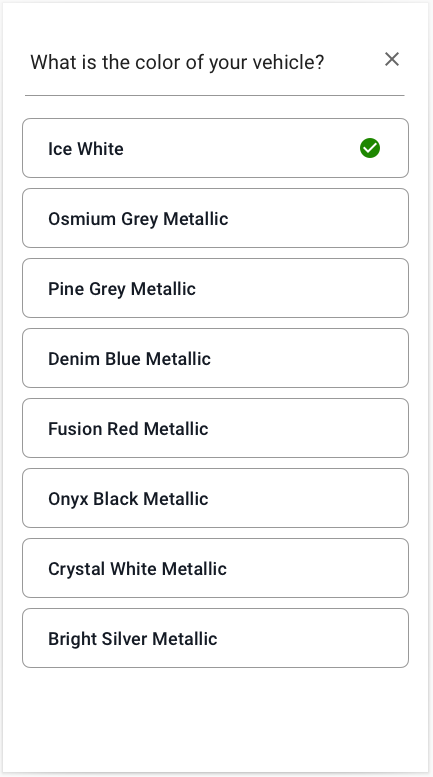
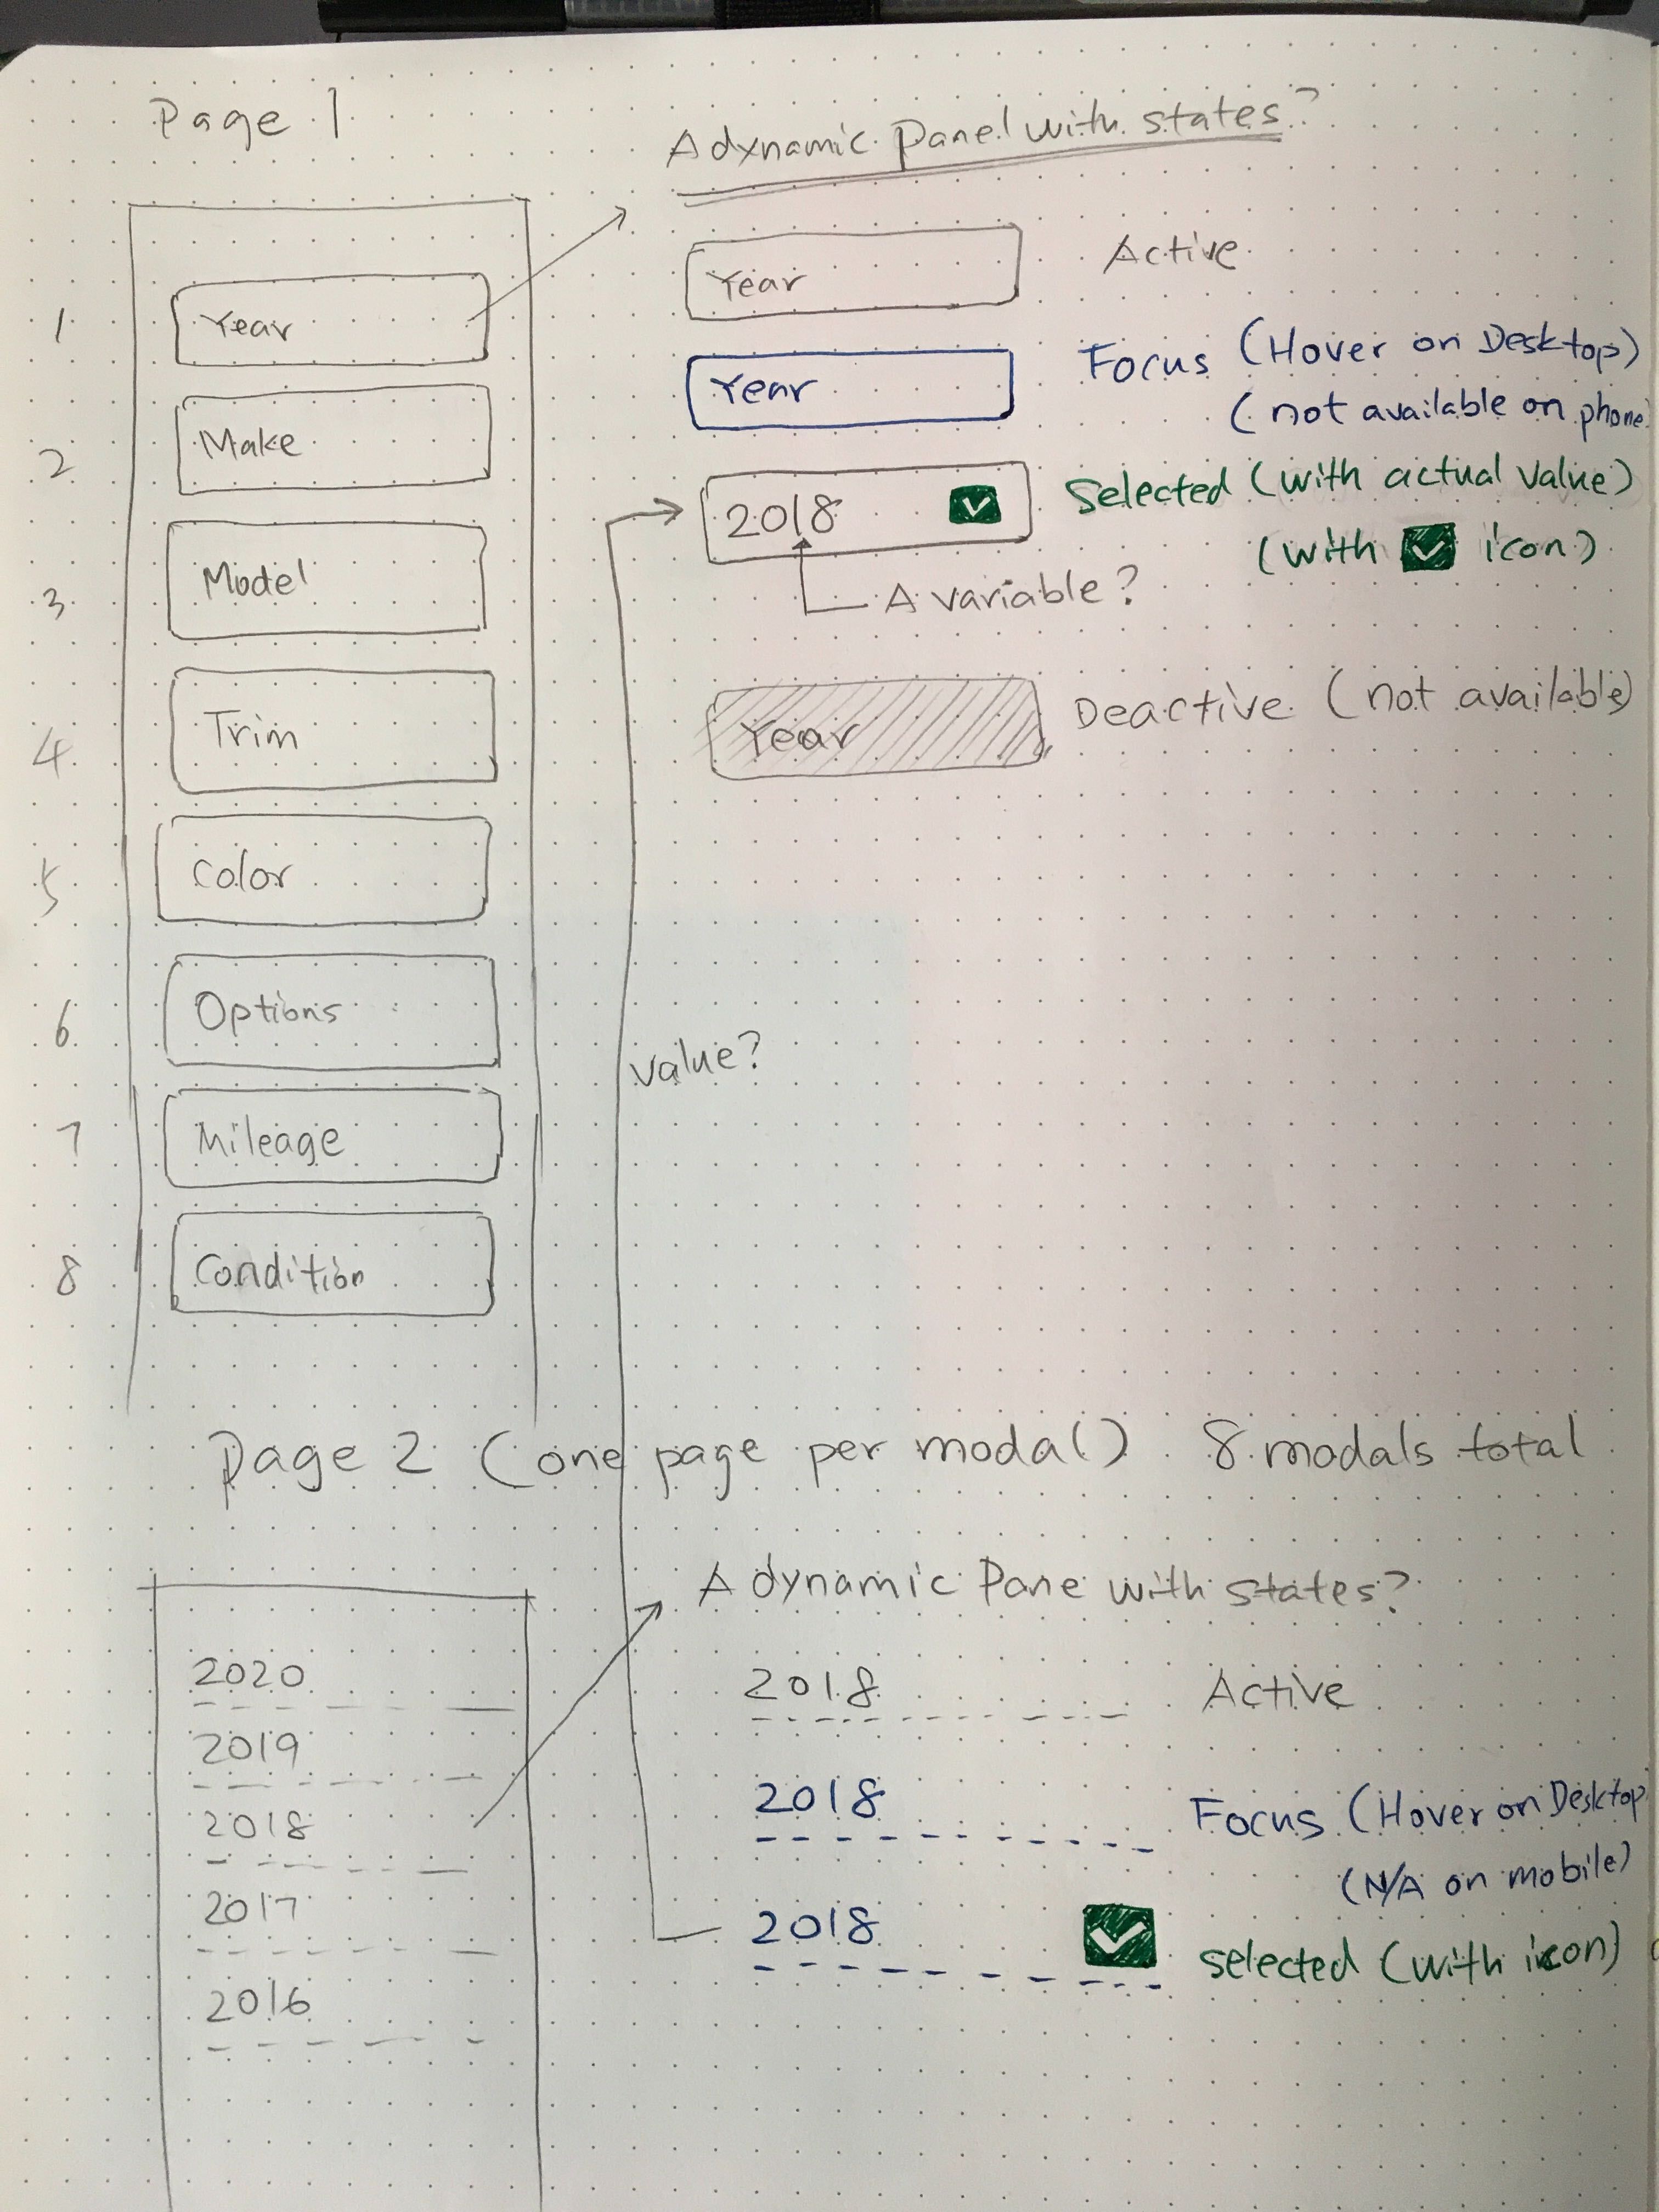
So I have this repeating list selector for evaluating a trade-in car value. It’s a screen with a check list of selectors, starting from Year, make, model to colors and options. Each button will open up a new full screen modal which has available choices for that selector. The Year modal will have years from 2020 all the way back to 2010. The Make will start with Acura(first) to Volvo(last), and the list goes on. The value you selected in the modal will be entered into the checklist button label. For instance, the “Year” will be shown as “2018” if 2018 is selected value in the modal.
There’re a few conditions are pretty tricky for me to figure out.
The model, trim, color, options are sequential, and depended on the previous selection. It is the order I have to keep to guide the user down the list. Maker decides what model, and trim, color, options… The following selections are grayed out(disabled) if the current selection hasn’t been made. The user can’t jump ahead.
If the main check list is complete, user goes back to change the make, it will reset all the entry below it. Say you originally picked Honda -> Civic -> EX -> white, if you go back to change Honda to Toyota, the remaining list will default to the original blank state with an activated selector: Model.
The modal selections are all single tap/click selection except for the Options and Mileage which requires an extra step of confirmation from the user. The single tap/click will make a selection. The modal close by itself and return to the main check list. There’s a 400ms delay after the tap/click to allow user sees what he has just selected in the modal before exit.
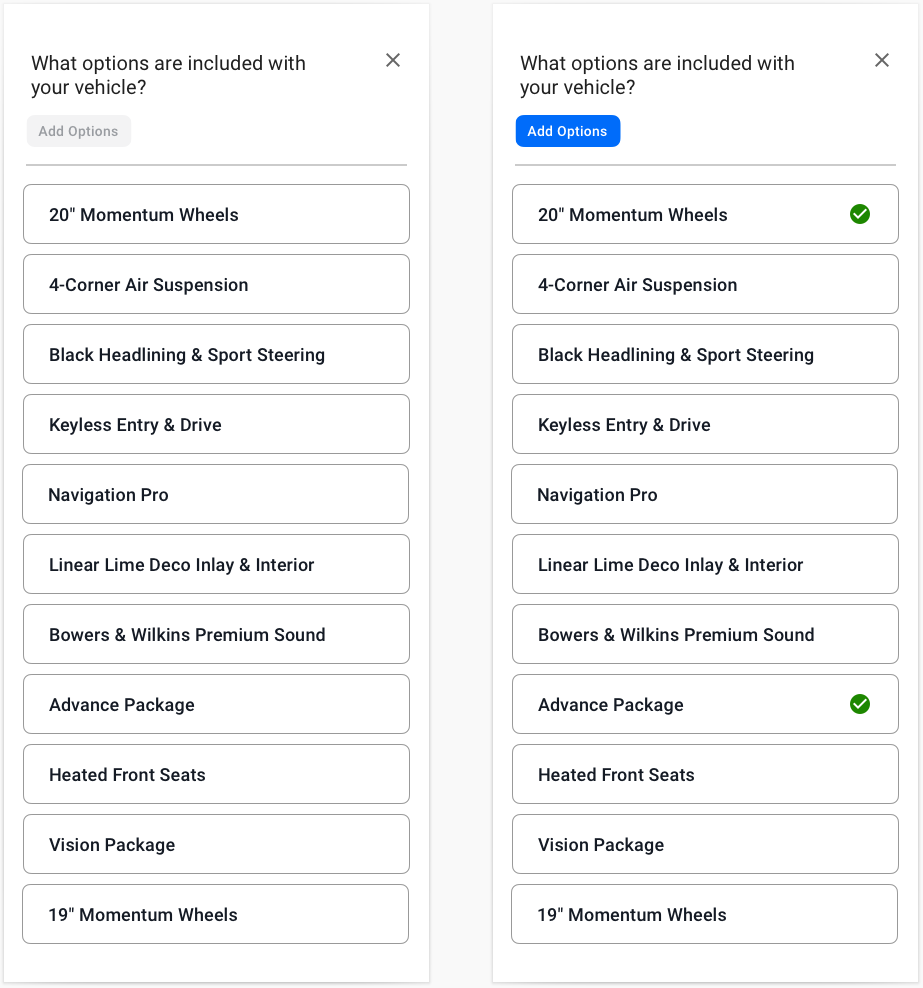
The Options selector has multiple choices since a car can have different add-on features/packages. The user needs to confirm “Add Options” before exiting the modal. The check list button label will show a portion of those options and truncates on the checklist selector.
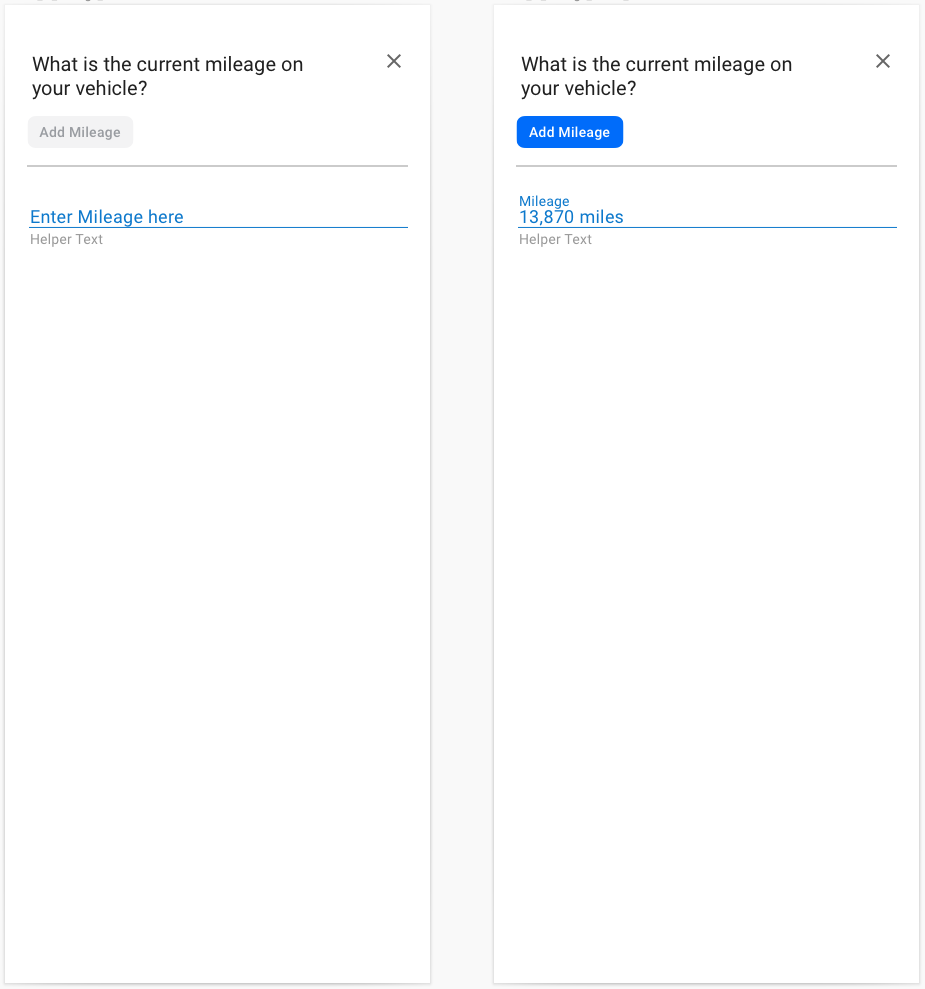
The mileage selector opens up a modal that has an input field and a confirming button “Add Mileage”.
My plan is to set up the checklist as a repeating list with each button as a dynamic panel. Each button has 4 states: Active, Focus(hover), Selected with actual value and a green checker, and Deactivated(greyed out). The label on the button would be some kind of variable. This variable would be changed on depending on the value that gets passed over from the the selection modal.
Not sure if this is the right approach. I’m not sure if all of the above behaviors can be done in Axure. I would like to hear some advice on how to set up components such as dynamic panels and masters, especially how to set up the variables and conditions. I have attached some screenshots here.
Yes, you can do all of this in Axure. You’ve done a good job of summarizing your prototype needs and objectives, but this is a LOT of things to cover in one forum post. Each item below could be its own thread–and some multiple threads. I’ll address each briefly here (which as you see ends up being, well, not so brief!) If this helps get you started, and you then run into issues with a specific item, I would suggest posting your .rp file and limiting a question to one topic per post/thread. Then, forum users can have a look at your prototype, apply suggested fixes and repost–so you can inspect and learn how they solved things. Make sense?
There are many different ways you could achieve each of your conditions/requirements. Some approaches will be easier to grasp and start, but perhaps harder to maintain/change/extend, while others may be more complicated to understand and set up, but may save time later as they are easier to maintain, more extensible, etc. It just depends on your overall purposes, audience(s), time, personal preferences, experience, etc.
In addition to this forum, the Axure Reference Pages and Tutorials are great for learning what features are available and demonstrations of how they are used.
I can think of a few main ways you could set up the basic structure for your prototype:
1a. One page per screen/view
A. Start (initial view, everything null; only the Year button is enabled)
B. Year (selection / modal)
C. Make (year selected; Make modal shown)
D. Models (perhaps multiple child pages under each Make, one for each Make’s Models)
E. Trims (perhaps child pages under each Model…)
…etc…
Better for a “documentation” prototype.
Easier and faster to jump to various views/stages.
Tends to be easier to debug.
Initial page should load faster.
Clunkier user experience and transitions, as the browser will “blank out” on each page load.
You’ll want a Master for the list of buttons, and get familiar with raising events from the Master.
1b. One page per button/selection
A. Year (buttons and year modal)
B. Make (buttons and Make modal)
…etc…
2a. One page only, with the body being a dynamic panel with a state for each screen/view.
Better for a “user test” or “smooth demo” prototype.
Good user experience and transitions.
Initial page may load slower.
Tends to be harder to debug, harder to navigate and find widgets and states in the editor.
2b. One page only, with 8 buttons, and a dynamic panel with 8 states–one for each modal.
–Clicking a button changes the dynamic panel state and shows it.
–Clicking a list item in modal updates the button and hides the dynamic panel.
3. One main page with 8 buttons and 8 “modal pages”.
–Clicking a button loads the associated modal page
–Then clicking a list item returns to the main page and updates the button’s text.
A kind of hybrid between approach 1 and 2, keeping faster page loads and easier debugging with (hopefully) reasonable user experience.
If you choose an approach with multiple pages, you’ll need to use global variables to track the selections. Easiest to just create 8 new ones (from Axure RP9 menu: Project > Global Variables) like “varYear” , “varMake” etc. That’s the only way to share data across different pages. If you have one page, you can still make use of global variables, but they’re not absolutely required. Instead, you could use the text value of the buttons (e.g., “Year” would change to “2012” upon selection of that year value.) or selection state in your modal list (e.g., clicking on “2018” would set that widget’s interaction state to Selected; when Selected the green checkmark would be shown.) …Up to you.
To do this, start with all the buttons disabled except for Year (you can click&drag over multiple widgets to select them.) Right/Alt-Click and choose “Disabled”. Or, in the INTERACTIONS pane, with one or multiple buttons selected, you can click the “Show All” menu button (near the bottom right) to get to the “Disabled” checkbox option. You can also create a visual style for the Disabled state this way.
Then, when the user makes a Year selection, use the “Enable” action to enable the Make button, and so forth.
Whenever you change the text of each button, enable the next button and disable the remaining buttons below, also resetting their text to default (Make, Model, etc.) For good measure reset/deselect the items in the associated modal lists as well (not necessary if modal is on its own page.)
I would recommend a separate dynamic panel for the confirmation, or display a confirmation button/icon upon selection.
You can use the Wait action in the Click or Tap event and set the value to 400.
A list of checkbox widgets best for this. You can set the text of the Options button by combining the text from the first few checkbox widgets and then appending an ellipsis (“…”). For example,
Set Text
buttonOptions
[[LVAR1]]
[[LVAR2]]
“(more…)”
…where LVAR1 is a pointer to “text on widget” checkbox1 ; LVAR2 is a pointer to “text on widget” checkbox2. See the reference documentation for Local Variables for more info.
You could do this, but it might be overkill. First of all, since the actions for each button are different, you probably don’t need to put them in a repeater. --But, if you use setup 3 (above) it could make sense, using the “reference page” option in a repeater dataset column.
Also, a single button widget can handle interaction styles of MouseOver (hover), MouseDown (click down-state), Selected, Disabled, and Focused (all in addition to the default/normal style). You can set a Selected event to show an image (like a “green checker”) and Unselected event to hide that image.
If you decide to use a dynamic panel for the button states, I recommend keeping the text as a separate widget in front of the dynamic panel for the button, so you don’t have to update and match 4 or 5 text values per button.
I haven’t read your entire message yet. I’ll get to it later. Today, everyone is talking about the election. Let me go through your message carefully. I also updated additional screen designs for this widget as a visual reference. I’ll get back to you. Thank you again!
I plan to use this prototype for usability testing and showing dev team what the behavior/interaction is like. I previously built an InVision click through which is not realistic enough to run an unmoderated usability testing. But I want to run an unmoderated test which allows the user to wander/explore so all of the buttons will need to work, no fake buttons.
A quick sketch on my idea of setting pages up. I’m leaning towards the #3 idea, because the structure feels similar to my UX flow. It’s easier for me to debug.
So I have one main page(check list), and 8 additional pages(modals). One page for each of the 8 modals. The main check list page has 8 buttons(dynamic panels). Each button has 4 different states: Active, Focus/Hover(only on desktop), Selected, Deactivated. The “Selected” state has a text variable which would display the value from the corresponding modal page. The modal page also have dynamic panels. One DP for each value. Each value selector has 3 states: Active, Focus/Hover(only on desktop), and Selected(with a green checker icon). So the idea is to set an event on tap/click on the value, and the text value will be passed to the target DP(button) on main page. The text value will replace the default text label. This is my starting plan. I’ll gradually build out all the other conditions/logic later. But I just want to be sure this is the right way to set things up and can be easily maintained. Let me know what you think.
Yes, I think the setup 3) --a kind of hub & spoke setup–makes the most sense for you.
I stubbed out a little proto to test if this would work well, and it seems to.
I have three global variables so far
varYear
varMake
varModel
I stubbed out three levels, up to Model
Three makes are stubbed out:
Acura
Alpha Romeo
Ferrari
The Make page has filter buttons (for A-E, F-J, etc.)
I decided on 4 Model pages to fit with the alphabetical groupings and minimize the number of repeaters on a page (more repeaters = longer loads) and stubbed out “Model A-E” and “Model F-J”
The Model A-E page has a dynamic panel with states for each Make (but only a few stubbed out; the rest of the makes can be duplicated and the repeater dataset edited.)
The “title” dynamic panel’s Loaded event updates the title to include the Make (“What model of Bentley?”) and change the “panel Models by Make” to the correct state, based on the value of varMake (so all state names must match the name of a Make; e.g., “Aston Martin” and not “State 5”)
Each repeater filters itself by year, only showing certain models based on the year. I did this to demonstrate a method to vary your lists by previous selections. So, the Acura repeater dataset has all models sold between 2010 and 2011, and it can be filtered to only show models available by year. To accomplish this, the repeater has “FirstYear” and “LastYear” columns. It’s Loaded event (which is called immediately after all rows are loaded) applies the filter with a rule to show only rows which have a “FirstYear” value greater than or equal to varYear AND a “LastYear” value less than or equal to varYear.
You’re sooo good, the proto looks great. I just downloaded your file and started to study it. Thank you so much for doing the work for me. Now, I don’t want to be lazy. So I’m going to rebuild mine own version from scratch. This is the only way to learn the variable/logic/condition. Will share the file once I have all the other modals made. Thanks again!
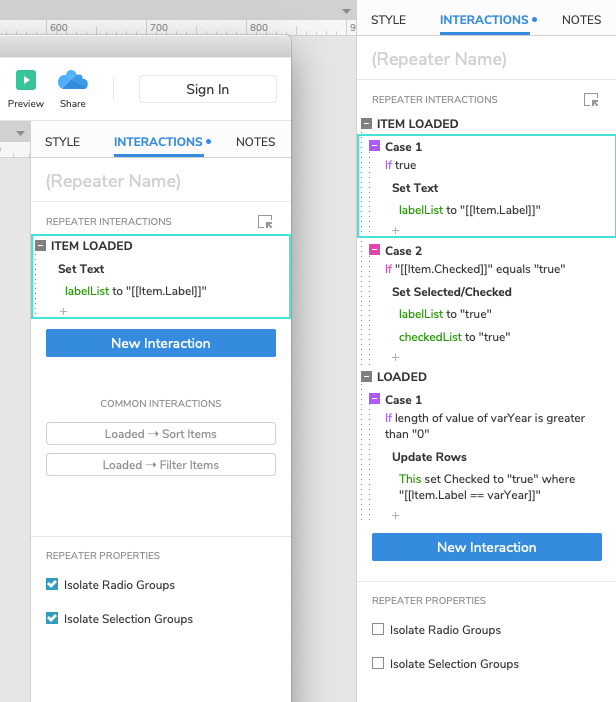
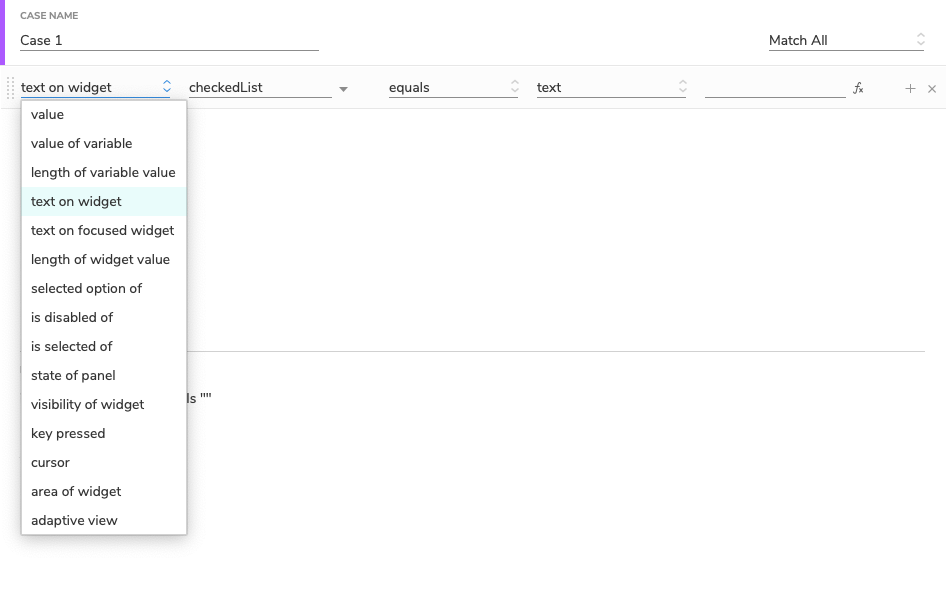
I tried to add a condition “if True” to Item Loaded(the repeater in the modal page). There’s no “If True” available in the condition builder. Am I doing sth wrong?
The way to create an “If True” case is to delete all the logic. This is the default for adding a new case, though. Be careful to pay attention to the “If” and “Else if” (right-click a case to change this) and that you have a maximum of one “If True” case per event.
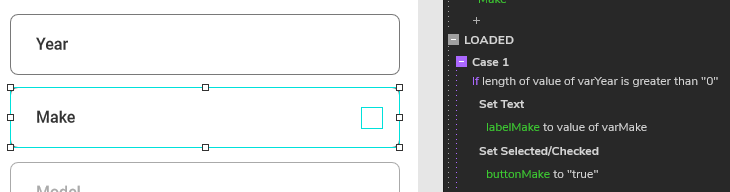
@mbc66 This where I’m at. I got stuck at the disappearing check list labels after exiting the previous modal. Not sure where it went wrong. I checked against your build, didn’t notice anything I missed. Thanks for the tip on the “if” and “else if” toggle.
Here’s the bug… for each button group you have a case in the LOADED event that basically tests the wrong global variable. Update the case condition code for each checklist button. For example, buttonMake should test the value of varMake and not varYear
So, as you have it now, when varYear is updated in the first step, e.g., user selects “2018” then the “length of its value is greater than 0” (because “2018” is 4 chars). But, the value of varMake is still the initial null (blank) so the text label gets set to blank.